Tuesday, December 30, 2014

DIY Fashion: Blanket Scarf ( The No SEW Scarf)

Hello! Lovelies

Scarves, Oh how I love a good scarf! Any time its remotely cold outside my go-to fashion accessory is a scarf. I'll even wear them occasionally in the summer if it's not to gawd awful hot outside. With that all being said sometimes scarves can be way over priced, cause' lets face it a scarf is nothing more than a square cut piece of fabric. Their isn't much work that goes into them so why pay outlandish prices when you can make your very own at home with little to no skill or money.

In recent years scarves have become more than an item of clothing to keep you warm, they've become a fashion statement all on their own. On fashion blogs, in magazines and boutiques you've seen the new "It" scarf, The "Blanket Scarf". You will find them all over the web and flooding your Instagram pages with women's OOTD posts.
Some can be rather expensive or just so popular that they are always sold out. So that's where this post comes in handy, Why not make your own?!?


All you'll need is a few basic things and some fabric. And best of all for those of you who don't sew, don't know how or just plain don't have the time this is the perfect  scarf tutorial for you.
 
You'll need:
 
2 1/2 - 3 yards 100% Cotton Plaid or Checkered Flannel (or similar acrylic Fabric)
Scissors
Seam Ripper
 or Pins
 
Step 1: Start by measuring your fabric. If you bought exactly the amount you will be using their is no need for this step. I bought enough to make two, so I just split it in half and cut width wise which gave me to equal pieces of fabric that both measured out 2 1/2 yards. Step 2: Make sure your fabric is cut as even as you can get it. This way your fringe will all be the same length and in the end your scarf doesn't look lopsided. Step 3: Start to pull out your thread. You will do this by either a seam ripper which I like best or sticking a needle in between the threads and pulling lose. Do whichever works best for you. Step 4: Keep repeating this process all they way down the width of your scarf going row by row until you get the length of fringe you want. Do this to both ends. Do note: That you only do this on the two ends of the scarf not all the way around. You will not be able to get the affect on all four sides due to how the fabric is woven.
 
In the end this only cost around $10 dollars. Depends on the fabric you buy. I bought mine from Joann Fabric if you live near one I recommend checking out their selection as well as downloading their FREE app, that way you can use one of their coupons and get up to 40% off.

Very easy and affordable way to get a new must have Winter fashion accessory.
 
I do hope you enjoy this tutorial. Would love to see pictures if you make one. Tag me on Instagram or Twitter @ChicCountryGirl
 
 
Love
Emily

 
 Disclaimer: Any photos used are mine unless otherwise posted with a * . This post was 100% created by me and photos are copyrighted to TheChicCountryGirl, If your sharing any of them please give credit to this site.

Wednesday, December 17, 2014

Recipe:Mama's Banana Bread | The Perfect Holiday Loaf!

Hello! Lovelies
 
 
Over the past few weeks I've been doing a lot of baking, a little by myself , some with Grandma for her church and then with my Mom. And well with the "Cookie Countdown" being over I thought I'd try and get up a few other recipes if I have the time that would make perfect gifts for neighbors or co-workers, or just anyone who loves a good homemade baked good (Which I think most all of us do.)
 
So today I thought I'd share my Mom's Banana Bread recipe that is loved by everyone that's had the pleasure of eating it.
 
It's also very easy to make. Perfect if you have over ripe Bananas hanging around.


Recipe:  Bake at : 350F  For: 35 - 40 Minutes Makes: 3 loafs (3.0 x 2.0 x 5.8)


1/2 Cup Shortening
2 Eggs
2 Cups Flour
1 Teaspoon Baking Soda
1/2 Cup White Sugar
3 ripe Bananas
1/4 Teaspoon Salt
 
Cream sugar, shortening and mashed bananas. Once creamed add in flour. Optional: Recipe calls for sifted flour but I never do. Measure out salt & soda and add to mixture.
 
Optional: You can add nuts or even chocolate chips are nice in Banana bread. The only reason this recipe doesn't have nuts is because my baked goods are eaten by family and my Dad & Brother are allergic.
 
Mix thoroughly and place in a greased 3x2x5.8 loaf pan and bake for around 35-40 minutes.


If you make this I'd love to see the end result. Tag me on Twitter or Instagram @ChicCountryGirl


Enjoy!


Happy Holidays!
 
Love
Emily

 
 Disclaimer: Any photos used are mine unless otherwise posted with a * . This post was 100% created by me and photos are copyrighted to TheChicCountryGirl, If your sharing any of them please give credit to this site.


Monday, December 15, 2014

6 Week Christmas Cookie Countdown: Week 6 | Gingerbread Men

Hello! Lovelies
 
 
So we have come to an end. Today is the last "Christmas Cookie Countdown" post, and what cookie better represents this time of year than the Gingerbread Man?
 When you think of holiday cookies you think of a cute Gingerbread Men or at least I know I do.
 
I've made them a few times before but never have I used Royal Icing to frost them. And I even made the icing from scratch, which was actually very easy to make. But I do think I made it a bit to thick which made it a little hard to pipe. But hey this was my first try and every new skill takes practice, so I think these turned out pretty good for my first go a round.
 
With this being the last "Christmas Cookie Countdown" that means next week is Christmas, Can you believe it? Where did these past 6 weeks go?!? Better yet what happened to 2014, Doesn't seam that long ago that it was Summer and then fall, Now Winter just snuck up on us. Even though here where I live we haven't had much snow :( Which I hope we get before Christmas. Nothing says Christmas Day like a frosty morning with snow flakes falling.
 
Anyways I hope you've enjoyed these recipes and I wish you all a very Merry Christmas.


Recipe:           Bake:  350 F    for 12 Minutes   Makes: roughly 2 - 2 1/2 dozen. Depends of the size of your cookie cutters.
 
 
1 1/2 Cups Molasses
1/3 Cup Shortening
1 Cup Brown sugar, Packed
2/3 Cup Cold Water
7 Cups All- Purpose Flour
2 Teaspoons Baking Soda
2 Teaspoons Ground Ginger
1 Teaspoon Salt
1 Teaspoons Ground Clove
2 Teaspoons Ground Cinnamon
 
In mixer or large bowl. Cream shortening and brown sugar. Add in Molasses and water. Mix. Add salt, soda and spices. Once that's been mixed through. Start adding in your 7 cups of flour. I recommend no more than two cups at a time. After you've mixed the cookie dough. Cover bowl with plastic wrap and place in the fridge for an hour.
 
Once the hour has passed roll dough (lightly grease counter top so dough doesn't stick) out until 1/4 inch thick (Mine I think we're a little thicker than that) you can make them as thick or thin as you want, you'll just need to watch the time and make sure you don't under cook or over cook them. I cooked mine for about 12 minutes.

When out of the oven place of wax paper and let cool 30 -45 minutes and frost with royal icing or dust with powdered sugar.


I really do hope you enjoy this recipe, if you try it I'd love to see your cookies and know how you liked them. Comment below or tweet/instagram me pictures at @ChicCountryGirl

 
Enjoy!

Happy Holidays!
 
Love
Emily

 
 Disclaimer: Any photos used are mine unless otherwise posted with a * . This post was 100% created by me and photos are copyrighted to TheChicCountryGirl, If your sharing any of them please give credit to this site


Monday, December 8, 2014

Makeup Monday: Givenchy Le Rouge Intense Color Sensuously Mat Lip Color 104 Brun Cachemire

Hello!  Lovelies
 
 
I love lipstick! I think it's one of the most feminine, girly things us ladies put on. But I have never been much of a fan personally until just recently. I've always loved the way it looked on other people, but never myself. In the past few weeks I've been trying to be brave and where lipstick outside the house. Before I used to just wear it when nobody was around cause' I've been made fun of in the past for wearing bold makeup and was afraid it would happen again if I wore lipstick.
 
My sweet mother treated me to this beautiful lipstick for my birthday. It's by the French brand Givenchy. I know how fancy, right? It's such a fun name to say.
 
I would consider my skin to be a light olive tone. Not very dark but also not on the pale side. My natural lips are on the darker rose side and this lipstick is just a bit deeper and brighter. A nice neutral day or night shade.


This lipstick is absolutely beautiful. From the tubes packaging (which is leather)  to the formula. This is what a high end lipstick should be. Easy & creamy to apply. Doesn't smudge easy or bleed. No need for a lip liner. Just the perfect everyday color.
 
If you are one of those who have been liking the 90s lips like Kylie Jenner has been rocking I recommend checking out this shade. It has that look without being overly brown.


Pros:
Long Lasting
Creamy
 
Cons:
Price
 
5 stars ☆☆☆☆☆

If you'd like to try this for yourself it can be bought at: Sephora, online & in-store.

Love
 EMILY

 
Disclaimer: Any photos used are mine unless otherwise posted with a * . I was not sent this item to review. The opinions are 100% my own.


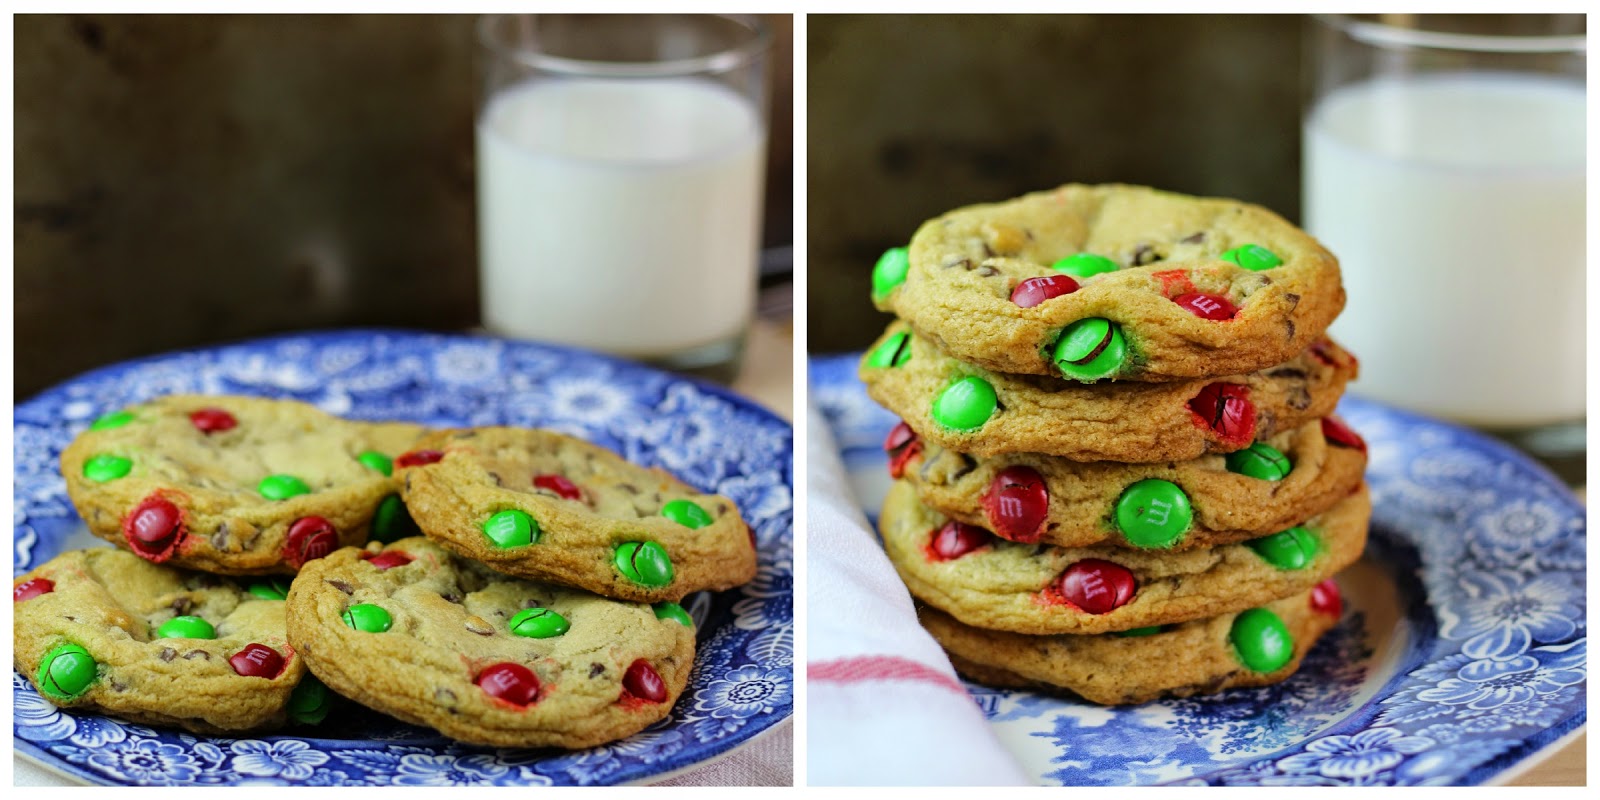
6 Week Christmas Cookie Countdown: Week 5 | M & M Chocolate Chip | The Perfect Christmas Eve Cookie for Santa!


Hello! Lovelies


Christmas is fast approaching. After today we only have one more cookie. The cookie recipe I am sharing today would be perfect to leave out for Santa with a nice glass of milk. If I were Santa Claus I'd rather enjoy these M&M Chocolate Chip Cookies.
I hope you do too.

 I really wanted to make a Chocolate chip cookie for the "6 Week Christmas Cookie Countdown" I feel like they are the most classic cookie. My normal go to Chocolate Cookie is my Grandmas but I don't share that recipe with anyone. It's a secret family recipe and now that my Grandma is no longer with us its even more special to me and I will treasure it forever. So this is what I came up with. It's inspired by this cookie I get from a Chocolate / Sweets shop in a small Colorado mountain town. 


Recipe: Pre-Heat Oven:  375 F   Bake: 10-11 minutes    Makes: 22 - 24  3 1/2 inch cookies 

2 Eggs

1 Cup Butter, Room temp

1/2 Cup White Sugar

1 Cup Brown Sugar

1 teaspoon Salt

1 1/2 teaspoons Baking Soda

2 teaspoons Vanilla 

2 1/2 Cups Flour

6 oz Mini Chocolate Chips

1/2 - 3/4 cup M&M's or similar Chocolate Coated Candy 


In bowl or stand mixer cream butter and white & brown sugar. Mix until smooth and add eggs. Mix. Add in salt, baking soda and vanilla. Mix through. Then start adding in your flour. Mix in 6 oz. of Mini Chocolate Chips. 

I then scooped them out with a medium sized cookie scoop (Approximately 2 tbsp). Once baked should measure 3 1/2 inches. If you'd prefer them smaller that works too, plus it will make more cookies.

I then placed 4-5 M&Ms on top the scooped cookies. Make sure to press them lightly into dough so they stick. 


I hope you enjoy this recipe, if you try it I'd love to know. Comment below or tweet me pictures at @ChicCountryGirl

 
Enjoy!

 
Love
Emily

 
 Disclaimer: Any photos used are mine unless otherwise posted with a * . This post was 100% created by me and photos are copyrighted to TheChicCountryGirl, If your sharing any of them please give credit to this site

Thursday, December 4, 2014

Merry Christmas Holiday Giveaway: Win the perfect Stocking Stuffer | Journal / Sketchbook Of Choice

Hello, Lovelies!
Christmas is fast approaching. Only 3 weeks away, Can you believe that?!? Where has the time gone. Seams like the older you get the faster the days, months and years pass by.
I wish I could give you all a gift this year but since that is sadly very impossible I thought I'd do a little giveaway. Nothing big but hopefully you all will enjoy it none the less.
What is more perfect than a journal during this time of the year to jot down all the memories you make with family & friends.

Closed winner has been picked, Thanks for entering! 


To enter:


Mandatory: What do you love most about Christmas? 

Follow my blog Via GFC
&
Like Crimson Hollow on Facebook

Extra Entries:

 Like The Chic Country Girl on Facebook
Follow Crimson Hollow on Tumblr
Follow Crimson Hollow on Instagram
Follow The Chic Country Girl on Pinterest
Follow ChicCountryGirl on Instagram
 Follow The Chic Country Girl on Twitter


Leave a comment for each entry you complete. Don't leave it all in one comment or that will just count as one (1).Don't forget to leave your Email or Twitter name so I can contact you if ya win!.

Winner will win Journal / Sketchbook of choice $10.00 or under
Giveaway will remain open 1 week, Until Dec 11. Winner has 24 hours to contact me before I pick a new winner. I'd like to get the item out to you before Christmas. Unless you live overseas than you might not get it until the New Year.
Open all ages & Worldwide
Merry Christmas & Happy Holidays!
~Emily


Tuesday, December 2, 2014

6 Week Christmas Cookie Countdown: Week 4 | White Chocolate & Cranberry Oat Cookies

Hello! Lovelies
 
Hope everyone had a lovely Thanksgiving. Seams like it's been non stop since Thursday. Not only was it Thanksgiving it was also my birthday. So I took a little blog break to relax and spend time with family.
 
 
What fruit says it's the Holidays more than Cranberries ?!?!
That is the question, because I can't think of any others.
So today I thought I'd share a simple , no fuss White Chocolate & Cranberry Oat Cookies recipe with you all. I don't know why but I only ever make Oatmeal cookies during the holidays. For some reason they make me think "Winter Treat".
 
But anyways lets get onto the recipe.


Recipe:   Pre Heat over 375 F Bake at: 375 F  For: 9 - 10 minutes Makes: about 3 dozen
 
1 Egg
3/4 Cup Shortening
1 Cup Brown sugar, packed
1/2 Cup White Sugar
1/4 Cup water
1 teaspoon Vanilla
1 1/4 cups Flour
1 Teaspoon Salt
1/2 Teaspoon Baking Soda
3 Cups Oatmeal
1/4 - 1/2 cup White Chocolate Chips
1/4 Cup Dried Cranberries
 
In a stand mixer or bowl. Beat egg, white & brown sugar until combined.  Add water. Then add in your shortening , salt, soda and vanilla. Once mixed through. Add oats. Mix. Slowly add in your flour. If they seam overly sticky add a bit extra flour.
 
Spoon onto baking sheet and bake for around 9 minutes.


I hope you enjoy this recipe, if you try it I'd love to know. Comment below or tweet me pictures at @ChicCountryGirl

 
Enjoy!


Love
Emily

 
 Disclaimer: Any photos used are mine unless otherwise posted with a * . This post was 100% created by me and photos are copyrighted to TheChicCountryGirl, If your sharing any of them please give credit to this site